Showing posts with label tools. Show all posts

06 May 2010

Chronology of my trimmer


Zision is my 1st trimmer and I love it so much. Now I use it as a scoring since I'm running out of it blade.


Fiskar is the stock I have when I opened an online store a few years back. At first I like it but when it come to straight line, it never does and 12x12 never fit to it cutter. I think the measurement out by 1or2mm. Still I used it for a long time since I have a lot of extra blade.

Yesterday I bought a new one, just a gift for myself as I manage to get back into scrapping world. It’s a little expensive from above trimmer. Haven’t try it yet…I think she is a good trimmer…isn’t you Cutterpede?


Posted by Picasa Pictures credit to Provo Craft, Fiskar and EK Success.

08 May 2007

Peralatan untuk scrapbook.

Memandangkan ramai yang bertanya apakah peralatan yang diperlukan untuk memulakan scrapbook, Ida cuba susun dan dapatkan gambar-gambar khas untuk pendatang baru dalam arena scrapbook khas dari bilik scrapbook Ida. Harap dengan infomasi ini dapat memudahkan kawan-kawan yang hendak memulakan hobi ini. Jika ada sebarang pertanyaan, jangan segan-silu untuk bertanya...tiada siapa yang rugi melainkan anda sendiri :D

1. Gunting - cari saiz yang sesuai untuk gunting kertas (muncung agak tirus) dan banyak terdapat di kedai buku dan alatulis.

2. Gam - pilih yang tulis acid free atau 'photo safe'. Di Malaysia agak sukar mendapatkan gam dalam bentuk roller dengan harga yang murah. Ida guna jenama Tombo, antara yang termurah tapi bukan murah kerana harganya dalam belasan ringgit.

3. Craft knife atau blade - Pisau ni ada sekali dalam Making Memories Deluxe Tools , di kedai-kedai biasa juga ada menjual craft knife dalam sekitar harga rm10 ke atas. Craft Knife ini sesuai untuk memotong bentuk-bentuk seperti alphabet dan pelbagai motif, tapi Ida terketar-ketar pakai pisau ni sebab susah juga nak potong bentuk-bentuk serong. Masa ni terfikir pada pembuat wau betapa kuat dan berseninya tangan mereka dalam proses pemotongan dan ini pengetahuan kawan-kawan dulu mereka hanya menggunakan pisau kecil sahaja untuk memotong, tak dapat Ida nak bayangkan. 4. Cutting mat - harga dari RM15 ke atas dan ada pelbagai size. Sekarang Ida jarang menggunakan cutting mat kecuali untuk melapik setiap kali buat scrapbook memandangkan banyak proses memotong Ida gunakan paper trimmer.


4. Cardstock (acid free) - terdapat pelbagai jenama di pasaran tapi yang selalu scrapbookers guna ialah Bazzill cardstock sebab card dia mempunya perlbagai tekstur dan warna yang menarik. Hendak tahu rahsia jimatkan duit? Gunakan bahagian depan dan belakang, dan anda dapat jimat sehelai kertas.


5. Pattern paper (acid free) - terdapat pelbagai jenama di pasaran bergantung kepada citarasa anda. Basic Grey, S.E.I, Autum Leave, American Crafts dan pelbagai lagi jenama untuk dipilih. Saranan Ida beli bila hendak pakai sahaja melainkan anda mempunya duit lebih.


6. Pen (acid free) - untuk penulisan ataupun boleh juga guna print out dari computer (print di atas cardstock anda)

8. Album - terpulang kepada anda saiz yang hendak digunakan cuma pastikan ianya acid free.

9. Yang terakhir dan paling penting sekali ialah GAMBAR anda.

Itu saja? Ya itu saja. Jangan terlalu boros berbelanja melainkan anda memang mampu, hapuskan tanggapan orang bahawa scrapbook untuk orang berada saja. Scrapbook ialah untuk semua lapisan masyarakat yang ingin mengabadikan kenangan untuk generasi akan datang ,untuk dijadikan hadiah atau untuk tujuan lain terserah kepada anda. Tiada peraturan dalam scrapbook cuma terserah kepada daya kreativiti anda. Semoga panduan ini dapat memberi sedikit gambaran kepada anda yang baru hendak bermula.

Jika anda mampu dan mahukan lebih lagi peralatan, Ida akan sambung bahagian 2 di mana banyak embellishments akan dibincangkan.

10 April 2007

Brad


    'Brad' terdapat dalam pelbagai bentuk, warna dan amat sesuai digunakan untuk scrapbook dan kad. Ia menambahkan warna, tekstur, dan daya penarik dalam setiap hasil kerja. Brad juga merupakan salah satu hiasan (embellishments) yang mempunyai banyak fungsi. Di sini Ida akan menunjukkan cara menggunakan brad dan beberapa idea untuk digunakan dalam projek anda.
    Cara penggunaan :-
    1. Lubang diperlukan untuk memasukkan bahagian belakang brads yang bercabang. Tebuk kertas dengan menggunakan penebuk kertas (making memories) ataupun boleh juga menggunakan hujung gunting yang tajam, pin , jarum dan pisau kraf. Semasa menebuk jangan lupa lapik kertas anda di atas mouse pad untuk mengelakkan penebuk kertas patah.
    2. Kemudian masukkan bahagian belakang brad ke dalam lubang yang telah ditebuk dan terbalikkan kertas dan buka bahagian bercabang brad.
    Siap. Brad amat mudah digunakan dan tidak memerlukan peralatan yang khusus. Ini adalah salah satu sebab mengapa brad amat popular di kalangan 'scrapbookers'.Sebab lain adalah kerana brad agak murah.
    Brad kegemaran Ida setakat ini ialah dari Making Memories, mungkin belum terdedah lagi kepada jenama lain. Brad terdapat dalam perlbagai saiz, bentuk dan warna. Setakat ini Ida cuma ada small Making Memories brads.
    Contoh-contoh lain fungsi brad :-

    1. melekatkan transparency atau vellum

    2. menguatkan lapisan kertas

    3. bahagian atas tag

    4. penyambung ( untuk membolehkan kertas digerakkan)

    5. bahagian tengah bunga

    6. corners untuk gambar yang telah dilapik (mat)

    7. 'bullets' untuk senarai journaling

    Kebanyakan permukaan brad berkilat dan sempurna. Jika anda ingin 'rustic touch' , gosok permukaan brads dengan menggunakan kertas pasir.

    Jangan risau jika anda tidak mempunyai warna yang diinginkan ketika membuat scrapbook, cat permukaan brad menggunakan acrylic paint. Markers juga boleh digunakan pada brad yang berwarna emas atau perak.

    Heat embossing? Boleh juga.... celup bahagian atas brad dalam ink kemudian celup ke dalam embossing powder. Panaskan dengan menggunakan heating gun atau bahagian luar atas oven and anda akan mendapat shiny embossed brad. Idea ini juga boleh digunakan untuk mendapatkan warna yang anda inginkan.

    Kawan-kawan (pembaca Ida ialah kawan Ida kan?) sekalian, jangan lupa mencuba dan kalau sudi bolehla berkongsi hasil anda disini. Brad amat mudah digunakan dan mempunyai pelbagai fungsi. Terdapat pelbagai jenis dan jenama di pasaran. Tapi ingat, bijak berbelanja kerana scrapbook adalah hobi yang agak mahal terutamanya kita di Malaysia. Kalau anda mempunyai rakan yang mempunyai hobi yang sama, boleh kongsi untuk mengelakkan pembaziran.

    Mungkin suatu hari bila Ida dah ada banyak barang-barang Ida akan kongsi bersama anda disini, dapatlah Ida meneruskan hobi dan passion Ida ni. Buat masa sekarang Ida masih bertatih lagi...... happy scrapping!

27 March 2007

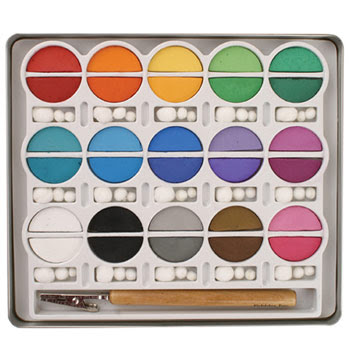
Pebbles Inc I'Kandee Basic Bright Chalk


Sorry kengkawan lambat nak post barang yang dapat hari tu sebab sibuk sangat. Ni pun nak post satu2 sebab nak bagi penerangan tentang kegunaan sekali. Buat homework sikit tadi tentang cara penggunaan....enjoy reading ya...

From about.com

Soft & easy to blend BEAUTIFUL colors presented in a secure metal case.Applicator & reusable pom poms included.Case 7 x 8 Acid free Over 28 Colors.
Price: us$16.00


Chalk are wonderful for blending colors and achieving softpastel effects. They can be used forshading in areas, creating backgrounds, coloring in a stamped design, etc.


H O W T O U S E


Applying Chalks: Apply the colors using your finger, a cosmetic sponge, crunched up paper towel,pom pom or a soft brush. Reapply chalk until the desired intensity of color is achieved. Stray marks can be erased with an art eraser.


Blending/Shading Colors: For shaded areas begin with the lightest color, moving to the darker, blending the edges of one color directly over another to achieve a third color. There are endless possibilities for colors and blends.


T E C H N I Q U E S


BACKGROUND TECHNIQUES


Chalk art makes a wonderful background for stamped projects.
For a streaked background, such as a sunset or sunrise, start near the center of the card and streak the colors outward. Combine several colors. Pull your finger or a sponge from the center out to the edge. Apply one color at a time, spacing the streaks as desired and then blend colors. Stamp the scenery elements on afterwards. (You may find matte finish paper to be the best choice for blending chalk colors.) An alternative for this technique is to cut a mask, covering the center area of the card. The streaks will appear to radiate from a center white area.


Chalk and water can be combined for a pastel background effect. Apply chalk in one or more colors randomly to the paper. Using a wet rag or sponge, pull and blend the chalked areas as desired. This technique is an excellent way to add color to freezer paper that will be used for gift wrap or gift bags. Once the background is dry, it can be stamped over, and it does not require spray fixative to remain in place.


Marbled background: Put about an inch of water into a pan slightly bigger than your card, With a knife, scrape chalk dust of several colors onto the surface of the water. Lower the paper flat onto the surface of the water to pick up the color, immediately lifting the card back out of the water. Allow to dry flat. If your paper develops puckers, it can be ironed to flatten it back out.


CHALK ON DARK PAPER: Create stunning stained glass designs. Stamp and emboss a stained glass design using white or metallic embossing powder. Color the inside areas with a heavy application of chalk, achieving a suede-like texture.


CHALK WITH THE BLENDER PEN: Chalk colors can be beautifully blended with the blender pen, which also "sets" the chalk, eliminating the need for spray fixative.


FINISHING YOUR PROJECT: If desired, use a spray fixative or hairspray when finished to keep chalk from smearing. This will also deepen the colors and add sheen.


Using a Blender Pen
The blender pen is a dual tip marker which is filled with clear blending fluid. The tip of the pen can be cleaned by simply scribbling ink color (from the last use) onto a scrap paper until it flows clear. Even though the tip appears stained, future performance will not be affected.


T E C H N I Q U E S


USING THE BLENDER PEN WITH INK PADS


Stamp an image using a water based dye pad. Use the blender pen to lightly stroke the outline color into the inside areas. This will result in an image with several tones of the same color; for example, a deep blue image with lighter, "watered down" blue inside.


USING THE BLENDER PEN WITH MARKERS
Stamp an image by coloring the rubber die of the stamp with water based markers. Pull color from the outline to the center areas by stroking with the blender pen, as above.
Use a blender pen to apply marker ink which has been scribbled onto a plastic plate, blending the colors just like you would blend watercolor paints with a brush.
Use a blender pen to soften the stroke marks left behind when you have colored an area with markers.


USING THE BLENDER PEN WITH WATERCOLOR PENCILS


The blender pen is perfect for blending watercolor pencil colors, eliminating the need for water and a paintbrush. The colors intensify and blend smoothly, and the paper does not buckle from being over-moistened.
USING THE BLENDER PEN WITH CHALK


Blend and moisten chalk colors with the blender pen to intensify colors and work the chalk into the surface of the paper. It will not need spray fixative to remain in place.


20 March 2007

Making Memories®Deluxe Tool Kit


I highly recommend this kit for beginner. Read for more info.
I had one....market price is RM249. But i bought RM150 (cheaper because no shipping charges as my friend brought back from overseas).


Tool Kit includes:


Universal Eyelet Setter ( 4 heads)
Features:
Makes eyelet setting easy
Evenly splits eyelet back flat to the page Hole punch with three heads
This size-adjustable punch can be placed anywhere you need on your paper project. Perfect for layouts requiring eyelets or carefully placed holes for detailing, this tool allows for easy switching of 1/16", 1/8", and 3/16" punch heads. For use on any craft project or scrapbook page.Features: Interchangeable 1/16", 1/8", 3/16" hole punches all included
Place anywhere on craft or scrapbook project Paper piercer


Delicate holes require a delicate tool. The Paper Piercer™ creates fine, precise holes in preperation for stitching or making intricate holes for attaching brads.Features:
Delicate enough to create fine holes


Hammer


Despite its appearance, this pint-sized Hammer makes quite an impact. Compact and portable, use it with Making Memories® Hole Punch, setter and stamping die set.


Features:
Ideal for travel and easy storage
Made especially for scrapbookers
Long handle for plenty of leverage
Quality hardwood handle
True steel head


paper needles


Use Details Paper Needles to stitch details onto your projects.


Features:
Instructions-To create a sewn accent on your page without wrinkling the paper, lightly mark your page where you wish to sew. Next, use the
Paper Piercer to punch holes along the line. Then thread your needle and sew through the existing holes.


Reverse-action tweezers


Making Memories® Tweezers make detail work a breeze. Fashioned with reverse-action handles, these tweezers do the holding for you. Use the Details Tweezers to simplify tasks such manipulating small stickers, picking eyelets out of their storage containers, and to hold items that you are gluing into place


6” metal ruler


Possibly the savviest rulers on the market, our 14" and 18" metal wonders juggle several tasks at once. Sure, they can measure and be used as a straight edge for cutting, but the unique center-finding function separates these rulers from the rest, making them a scrapbookers delight. Center finding and inches Available in 14" and 18" lengths


Craft knife with 6 replacement blades


Get the cleanest cuts with Craft Knife and replacement blades. Just place the self-healing cutting mat on a firm, solid surface and cut to your heart’s content.


Features:
Store extra blades in handle
Works with a variety of lightweight materials such as paper, foil, felt and fabric
Use with center finding metal rulers
Contains 6 blades per package

Stylus


Essential for both card making and scrapbooking. Use the round tip to dry emboss, apply Rub-ons and score a fold. Use the flat end to sharpen a crease on a fold.


Features:
Designed especially for use with Making Memories® rub-ons


4 x 4 setting mat


Ever wish your table had self-healing agents? Quit marking up your household surfaces by using our self-healing cutting mats. With ruled guides for placement, you’ll find our mats ideal for cutting or setting eyelets, snaps and other embellishments.Features:
Scale printed on self-healing surface for easy measuring
1” gridlines on 10"x 10" and 4"x 4" mats, ½" gridlines on 17"x 23" mat
Durable working surface for use with cutters or knives
Available in 3 sizes:
4"x 4"
10"x 10"
17"x 23"


Glue pen


Tin Case

08 March 2007

Free....


Baru terima craft punch hari ni...percuma.....yahoo!!!!!!!!!!!!!

26 February 2007

Scrapbooking recipe for frugal beginner.

1. Scissors
2. Adhesives - for photos
3. Craft knife/blade and cutting mat4. Cardstock (use front and back) -acid free
5. Pattern paper (buy when needed!) -acid free
6. Pen for journaling -acid free
7. Page protector -acid free
8. Album
Don't forget the most important thing is your photos. That it!


In some cases when you are not particular about spending more, put these items in your shopping list :-
1. Fine pointed scissors & standard pair scissors
2. Craft knife
3. Cutting mat
4. Metal ruler
5. Adhesives (temporary & permanent bond)
6. Eyelet setter
7. Hole punch
8. Setting mat (for hammering hole punch or eyelet setter)
9. Paper trimmer
10. Mini hammer
Once you've stocked up on the basic tools, indulge yourself with these treats :-
1. Ribbon - used as bands across a layout or to tie on the embellishments.
2. Patterned paper
3. Brads
4. Sheets of lettering - from peel-offs to rub-ons, every style alphabet and ready-made phrase is at your disposal.
5. Embellishments - from button to alphabets, mini frames to metal charms, you can never have enough.
6. Acid-free cardstock - you will use more of this than anything else.
7. Eyelets
8. Specialist pens
9. Craft punch
Lets get started………………

16 February 2007

Color wheel


Google pagi tadi untuk cari color wheel dan jumpa chart ni dari web http://www.rentaldecorating.com dan www.artsconnected.org


Chart ini sesuai untuk 'beginner scrapbooker ' yang buntu dalam memilih warna.
Cara untuk memilih warna seperti berikut :-


1. Mono-chromatic: Using one color (hue) throughout, utilizing that colors various tints, tones and shades. When using a mono-chromatic scheme using multiple textures creates character and maintains unity.

2. Complimentary: Using two colors (hues) that are opposites such as red and green or violet and yellow. Choose varying tints tones and shades which will give the bold dramatic effect you are looking for.

3. Analogous: Using three colors (hues) that are neighboring each other on the color wheel. These schemes can be warm or cool since colors are adjacent on the color wheel.

4. Triadic: Using three colors (hues) that are equal distance apart on the color wheel, such as red, yellow and blue or using secondary colors yellow-green, blue-violet, and red-orange.
TERMS TO KNOW
Hue: Another name for color
Tint: Color + White
Tone: Color + Grey
Shade: Color + Black
Value: The lightness or darkness of a color.
Chart ini hanyalah sebagai panduan, tiada salah dan betul dalam pemilihan warna terpulang kepada individu sendiri.

15 February 2007

Basic

Kata seorang kawan dan mungkin ramai lagi yang berpendapat begini 'Scrapbook hobi yang mahal'. Tapi sebenarnya sebagai pengguna kita perlu bijak dalam memilih. Sebenarnya bahan asas untuk scrapbook terdapat di dalam rumah kita cuba check ada tak barang-barang ni dalam rumah
1. gunting
2. photo glue
3. gambar
Ada tak?
Ok kalau ada dan berminat untuk menyimpan memori/gambar untuk santapan generasi kita yang akan datang jom kita belajar macamana cara nak preserve memory ni .....semoga generasi kita dpt mengenali kita lagi walaupun kita sudah tiada. Macam Ida langsung tak tahu siapalah moyang dan asal-usus keturunan. Scrapbook pada Ida, mencipta sejarah untuk disimpan dan ditatap oleh generasi yang akan datang. Jangan tak percaya scrapbook ni memang addicted kalau dah start & terapi untuk diri sendiri. Kalau tak percaya cubalah sendiri!
Ok kita tunggu sesiapa berminat barulah kita mula...ok?

My new craft punches


Baru beli semalam di Parkson KLCC. Semua ni less 20% sehingga 17.2.2007, kepada sesiapa yang nak beli tu pergi cepat sebab offer habis lagi 2 hari. Harga untuk border punch, craft punch sweet heart dan craft punch kikyou RM18 lepas less RM14.40. Craft punch yang kecil tu (biru) kikyou-l RM13 lepas less RM10.40. Terjumpa juga Carl alphabet punch set dengan harga RM235++ (lupa la pulak harga dia) Semalam try border punch tu agak keras sikit kalau guna atas kertas cardstock, nanti kalau ada budget lagi nak beli CP-M Punch Mate.


CARL ULPHABET PUNCH SET
CARL CP-M Punch MateMasih ada dua lagi CP-A Mega Punch Aid dengan harga RM65. Kegunaan punch aid ni untuk memudahkan kerja2 'punching'