31 March 2007

My soul

Source :
- MM Foam Stamps Philadelphie
- MM Scrapbook colors Daiquin & Mango
- Bazzill cardstock (blue & orange)
- Basic Grey pattern paper Romani - Bohemian
- Black arcylic
- American Crafts Elements Premium Ribbon - Uptown Orange
- Francheville journal pen
- Carl sweet heart craft punch

30 March 2007

My Creative Companion by Becky Higgins


Ida teringin sangat buku ni tapi mahal sangat, sudahnya hari tu pinjam dari kawan dan cuba tiru macam Becky Higgins buat, cuma buku Ida di dalam cd file. Bila jumpa design yg menarik Ida akan draft atas post it pad dan tampal mengikut tajuk. Kepada yang mampu buku ni memang banyak membantu dalam proses mereka layout anda. Kepada yang tak mampu apa kata buat sendiri as I did ! eNJOY.......


Info dari http://www.creatingkeepsakes.com
Ever feel like your creativity well has gone dry? My Creative Companion 2 is the ultimate collection of ideas for everything from the smallest accent to complete layout designs. Packed with colorful illustrations and simple explanations, it will become a constant source of instant inspiration.
Sections include:
Accents
Borders
Journaling & Titles
Layout Design
Photo Mats
Odds & Ends
My Ideas
Inside, you'll find:
More than 825 full-color illustrations of innovative accents, borders, photo mats, and journaling and title treatments that can be easily duplicated or customized.
Over 135 layout sketches for single and multiple photos you can use today.
Quick-and-easy color combination, background and texture ideas.
60 never-before-seen layouts that showcase the sketches' adaptability and flexibility.
A cool ruler to customize your own sketches.
$29.95.
250 pages.
Foreword by Becky HigginsImagine someone going through every scrapbook magazine and idea book and compiling a collection of really great ideas for you to have every time you scrapbook. Imagine no longer! We've gone through the past few years' worth of Creating Keepsakes magazines and special issues and found the most innovative and unique ideas to include in this book.Simply gather the pictures you want to use and flip through this book to find just the perfect touch for your page. Switch up the colors, change the materials you use—do whatever you'd like to make it your own.Enjoy the all-new layouts showing the illustrations and sketches in use. And let this guide be a jump-start for your creativity as you continue in your scrapbooking endeavors.-Becky Higgins

27 March 2007

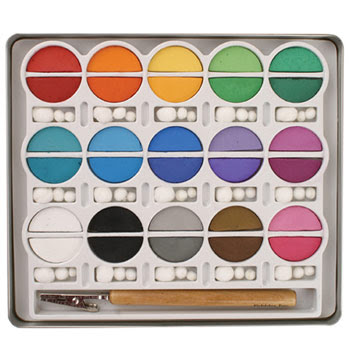
Pebbles Inc I'Kandee Basic Bright Chalk


Sorry kengkawan lambat nak post barang yang dapat hari tu sebab sibuk sangat. Ni pun nak post satu2 sebab nak bagi penerangan tentang kegunaan sekali. Buat homework sikit tadi tentang cara penggunaan....enjoy reading ya...

From about.com

Soft & easy to blend BEAUTIFUL colors presented in a secure metal case.Applicator & reusable pom poms included.Case 7 x 8 Acid free Over 28 Colors.
Price: us$16.00


Chalk are wonderful for blending colors and achieving softpastel effects. They can be used forshading in areas, creating backgrounds, coloring in a stamped design, etc.


H O W T O U S E


Applying Chalks: Apply the colors using your finger, a cosmetic sponge, crunched up paper towel,pom pom or a soft brush. Reapply chalk until the desired intensity of color is achieved. Stray marks can be erased with an art eraser.


Blending/Shading Colors: For shaded areas begin with the lightest color, moving to the darker, blending the edges of one color directly over another to achieve a third color. There are endless possibilities for colors and blends.


T E C H N I Q U E S


BACKGROUND TECHNIQUES


Chalk art makes a wonderful background for stamped projects.
For a streaked background, such as a sunset or sunrise, start near the center of the card and streak the colors outward. Combine several colors. Pull your finger or a sponge from the center out to the edge. Apply one color at a time, spacing the streaks as desired and then blend colors. Stamp the scenery elements on afterwards. (You may find matte finish paper to be the best choice for blending chalk colors.) An alternative for this technique is to cut a mask, covering the center area of the card. The streaks will appear to radiate from a center white area.


Chalk and water can be combined for a pastel background effect. Apply chalk in one or more colors randomly to the paper. Using a wet rag or sponge, pull and blend the chalked areas as desired. This technique is an excellent way to add color to freezer paper that will be used for gift wrap or gift bags. Once the background is dry, it can be stamped over, and it does not require spray fixative to remain in place.


Marbled background: Put about an inch of water into a pan slightly bigger than your card, With a knife, scrape chalk dust of several colors onto the surface of the water. Lower the paper flat onto the surface of the water to pick up the color, immediately lifting the card back out of the water. Allow to dry flat. If your paper develops puckers, it can be ironed to flatten it back out.


CHALK ON DARK PAPER: Create stunning stained glass designs. Stamp and emboss a stained glass design using white or metallic embossing powder. Color the inside areas with a heavy application of chalk, achieving a suede-like texture.


CHALK WITH THE BLENDER PEN: Chalk colors can be beautifully blended with the blender pen, which also "sets" the chalk, eliminating the need for spray fixative.


FINISHING YOUR PROJECT: If desired, use a spray fixative or hairspray when finished to keep chalk from smearing. This will also deepen the colors and add sheen.


Using a Blender Pen
The blender pen is a dual tip marker which is filled with clear blending fluid. The tip of the pen can be cleaned by simply scribbling ink color (from the last use) onto a scrap paper until it flows clear. Even though the tip appears stained, future performance will not be affected.


T E C H N I Q U E S


USING THE BLENDER PEN WITH INK PADS


Stamp an image using a water based dye pad. Use the blender pen to lightly stroke the outline color into the inside areas. This will result in an image with several tones of the same color; for example, a deep blue image with lighter, "watered down" blue inside.


USING THE BLENDER PEN WITH MARKERS
Stamp an image by coloring the rubber die of the stamp with water based markers. Pull color from the outline to the center areas by stroking with the blender pen, as above.
Use a blender pen to apply marker ink which has been scribbled onto a plastic plate, blending the colors just like you would blend watercolor paints with a brush.
Use a blender pen to soften the stroke marks left behind when you have colored an area with markers.


USING THE BLENDER PEN WITH WATERCOLOR PENCILS


The blender pen is perfect for blending watercolor pencil colors, eliminating the need for water and a paintbrush. The colors intensify and blend smoothly, and the paper does not buckle from being over-moistened.
USING THE BLENDER PEN WITH CHALK


Blend and moisten chalk colors with the blender pen to intensify colors and work the chalk into the surface of the paper. It will not need spray fixative to remain in place.


26 March 2007

Scrapbook glossary

Buffered paper - During manufacture, a buffering agent such as calcium carbonate or magnesium bicarbonate can be added to paper to neutralize acid contaminant. Such papers have a pH of 8.5.

Journaling - Journaling refers to text on a scrapbook page giving details about the photographs. It can be done in your own handwriting or with adhesive letters, rub-ons, and stencils. It is probably the most important part of memory albums.

Lignin - Lignin is the material that holds wood fibers together as a tree grows. If lignin remains in the final paper (as with newsprint), it will become yellow and brittle over time. Most paper other than newsprint is lignin-free.

pH factor - The pH factor refers to acidity of a paper. The pH scale is the standard for measurement of acidity and alkalinity. It runs from 0 to 14, each number representing a tenfold increase; neutral is 7. Acid-free products have a pH factor of 7 or above. Special pH tester pens are available to help you determine the acidity or alkalinity of products.

Photo-safe - Photo-safe is a term similar to archival quality but more specific to materials used with photographs. Acid-free is the determining factor for a product to be labeled photo-safe.

Sheet protectors - These are made of plastic to slip over a finished album page. They can be side-loading or top-loading and fit 8-1/2 x 11-inch or 12 x 12-inch pages. It is important that they are acid-free. Polypropylene (vinyl), commonly available for office use, is not of archival quality and should not be included in albums.

Materials Albums - Photo-friendly, acid-free albums are available in standard 8-1/2 x 11-inch, 12 x 12-inch, and 5 x 7-inch sizes. Most will let you insert plastic page protectors. The most popular types of scrapbooking albums are:
Three-ring: These familiar favorites have rings that snap apart for easy page insertion and removal.
Spiral-Bound: Albums with this type of wire binding have permanently attached pages and are ideal for one-topic and themed scrapbooks.
Strap-style: Albums that use plastic straps allow the pages to lie completely flat when the album is opened.

25 March 2007

Name frame 3


Source : Acrylic color (black), cardstock, brads, frame, alphabet form.


24 March 2007

Magazines extravagant


Dari Sungai Wang hingga ke Amcorp Mall....inilah hasilnya....10 buah buku.
Scrapbooking & card making. Sekarang ni tengah buah card making gak sebab member office minta tolong buatkan.

22 March 2007

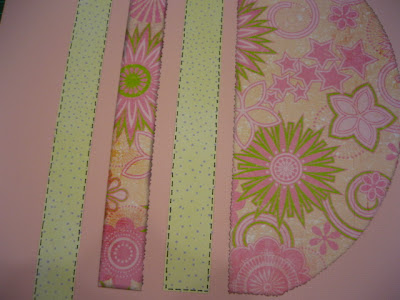
Stitching using a gel pen.

If you love the stiching on your layout yet doesnt has a sewing machine, try this tip - use a gel pen to create a stitched. You can do any design you want. I did it before...will find a picture to post it here.


And here it is....

21 March 2007

Sketch

Special for Musliha.
You can choose the layout which is suite to your taste.
Enjoy!


http://www.sketchlover.com/id6.html

20 March 2007

Making Memories®Deluxe Tool Kit


I highly recommend this kit for beginner. Read for more info.
I had one....market price is RM249. But i bought RM150 (cheaper because no shipping charges as my friend brought back from overseas).


Tool Kit includes:


Universal Eyelet Setter ( 4 heads)
Features:
Makes eyelet setting easy
Evenly splits eyelet back flat to the page Hole punch with three heads
This size-adjustable punch can be placed anywhere you need on your paper project. Perfect for layouts requiring eyelets or carefully placed holes for detailing, this tool allows for easy switching of 1/16", 1/8", and 3/16" punch heads. For use on any craft project or scrapbook page.Features: Interchangeable 1/16", 1/8", 3/16" hole punches all included
Place anywhere on craft or scrapbook project Paper piercer


Delicate holes require a delicate tool. The Paper Piercer™ creates fine, precise holes in preperation for stitching or making intricate holes for attaching brads.Features:
Delicate enough to create fine holes


Hammer


Despite its appearance, this pint-sized Hammer makes quite an impact. Compact and portable, use it with Making Memories® Hole Punch, setter and stamping die set.


Features:
Ideal for travel and easy storage
Made especially for scrapbookers
Long handle for plenty of leverage
Quality hardwood handle
True steel head


paper needles


Use Details Paper Needles to stitch details onto your projects.


Features:
Instructions-To create a sewn accent on your page without wrinkling the paper, lightly mark your page where you wish to sew. Next, use the
Paper Piercer to punch holes along the line. Then thread your needle and sew through the existing holes.


Reverse-action tweezers


Making Memories® Tweezers make detail work a breeze. Fashioned with reverse-action handles, these tweezers do the holding for you. Use the Details Tweezers to simplify tasks such manipulating small stickers, picking eyelets out of their storage containers, and to hold items that you are gluing into place


6” metal ruler


Possibly the savviest rulers on the market, our 14" and 18" metal wonders juggle several tasks at once. Sure, they can measure and be used as a straight edge for cutting, but the unique center-finding function separates these rulers from the rest, making them a scrapbookers delight. Center finding and inches Available in 14" and 18" lengths


Craft knife with 6 replacement blades


Get the cleanest cuts with Craft Knife and replacement blades. Just place the self-healing cutting mat on a firm, solid surface and cut to your heart’s content.


Features:
Store extra blades in handle
Works with a variety of lightweight materials such as paper, foil, felt and fabric
Use with center finding metal rulers
Contains 6 blades per package

Stylus


Essential for both card making and scrapbooking. Use the round tip to dry emboss, apply Rub-ons and score a fold. Use the flat end to sharpen a crease on a fold.


Features:
Designed especially for use with Making Memories® rub-ons


4 x 4 setting mat


Ever wish your table had self-healing agents? Quit marking up your household surfaces by using our self-healing cutting mats. With ruled guides for placement, you’ll find our mats ideal for cutting or setting eyelets, snaps and other embellishments.Features:
Scale printed on self-healing surface for easy measuring
1” gridlines on 10"x 10" and 4"x 4" mats, ½" gridlines on 17"x 23" mat
Durable working surface for use with cutters or knives
Available in 3 sizes:
4"x 4"
10"x 10"
17"x 23"


Glue pen


Tin Case

18 March 2007

Good Times layout


Baru siap pagi tadi, siap dalam masa 3 jam. Kali pertama menggunakan warna yang bukan my fav. Lebih mudah jika menggunakan sketch tapi bagi Ida,menggunakan daya kreativiti sendiri lebih puas. Ini cubaan pertama menggunakan sketch dari Becky.

14 March 2007

Name frame


Baru siap..kawan office minta tolong buatkan. Mencabar jugak...tapi nasib baik tools baru sampai, dapatla juga siapkan. Comments please...ok ke tidak?

Scrapbook glossary

Terms

Acid-free - Acid is used in paper manufacturing to break apart the wood fibers and the lignin that holds them together. If acid remains in the materials used for photo albums, the acid can react chemically with photographs and cause their deterioration. Acid-free products have a pH factor of 7.0 or above. It's imperative that all materials (glue, pens, paper, etc.) used in memory albums or scrapbooks be acid-free.

Acid migration - Acid migration is the transfer of acidity from one item to another through physical contact or acidic vapors. If a newspaper clipping is put into an album, the area it touches will eventually turn yellow or brown. A deacidification pH factor spray can be used on acidic papers, or they can be color photocopied onto acid-free papers. Archival quality -

"Archival quality" is a term used to indicate materials which have undergone laboratory analysis to determine that their acidic and buffered content is within safe levels.

12 March 2007

Scrapbooks etc - design secret 2006


I had lent this book from a dear friend for a couple of weeks. Design secret is like a blue print for us to build our own designing skills.
Summary :-
Planning - every great scrapbook page starts with a plan for both its story and its structure.

“BEFORE YOU START YOUR LAYOUT THINK ABOUT THE STORY YOU WANT IT TO TELL. THEN KEEP THE STORY IN MIND AS YOU DESIGN “

1. Intention – before you make any design decisions, it helps to know what you want your page to say and to whom. It’s called designing with intention, and it’s the difference between telling a story and simply decorating card stock.
How?
- Who is your audience?
Example -My kids
-What sort of message and mood did you want to convey?
Example – I wanted to capture the playfulness of this day of blowing bubbles
- What design decisions did you make to help communicate your message and mood?
Example – to play up the playful nature of this page, I used energetic, bold shapes and colors. To further the bubble theme, I formatted my journaling text and accents to mimic the shape of a bubble wand. I also chose pattered paper that carried on this circle motif.

2. Composition – the most basic aspect of your layout design is how you arrange elements on the page. Where you place your photos, text and accents in relationship to one another can make a big difference in how effective they are in telling your story.

a. emphasis – before you do anything elase, pick your focal point – the first place you want the viewer to look to quickly get the point of your layout.
b. structure – a deliberate structure is the basic foundation of any page. Thinking of your page as a grid can help you envision that structure. – use a grid as a guide rather than a rigid boundary. You don’t have to stay inside the lines.
c. balance – there are many ways to create balance in your pages where no one element appears to be too heavy.
d. space – empty space can be as important an element in your page design as those things that take up space. White or empty space can make a dramatic impact on your layout.
e. bridging and grounding – once you have formulated the basic structure of your layout find ways to connect your elements.
f. movement – the way you arrange your page elements can help direct the viewers eye through the page.

08 March 2007

Free....


Baru terima craft punch hari ni...percuma.....yahoo!!!!!!!!!!!!!

06 March 2007

Mother's day gift

Semalam sempat catit sedikit info untuk melengkapkan album yang bakal diberi kepada mak sempena sambutan hari ibu nanti...mmm..hopefully sempat siapkan...kalau tak sempat kenalah bagi time birthday mak. Bagi memudahkan proses ni Ida dah bahagikan segmen-segmen untuk memudahkan kerja.
- her parents
- her siblings
- her friends
- her schooling
- her childhood
- her husband
- her children
- her grandchildren and in law
- her home
- her job
- her contribution
- our appreciation to her....a letter from her children....

05 March 2007

Tugas baru

"Semua gambar anak-anak mak satu pun tak ada simpan dalam rumah ni. Gambar kahwin mak pun tak ada."
Sayu dah pilu Ida mendengarnya, semalam juga Ida bawak balik semua gambar yang dah kuning untuk dibuat scrapbook khas untuk ibu tercinta. Bukan mudah tugas ni, nak kena kumpul data dan cari balik gambar-gambar dia dari saudara-mara. Ingat nak kena tanya balik semua adik-beradik mak yang ada simpan gambar mak ni. Lepas tu nak kena cari scanner pulak, yang ada tu dah meletup agaknya.

04 March 2007

Journaling tips

• Start with the basics—who, what, when, where, why and how. Even just
starting to write helps.
• Write about an easy topic, then move on to harder ones.
• Resist the impulse to try to write in your head. Put the words on paper or a computer screen and move them around.
• Try talking with a friend about what you want to write.
• Start with a really rough first draft. You can always improve your writing
once you've gotten it on paper.

03 March 2007

Scrapbooking 101 workshop at Papier


1. Pilih gambar yang mempunyai tema yang sama. Pilih kertas yang sesuai untuk latar belakang.


2. Pilih warna kontra untuk menonjolkan gambar.


3. Pilih warna yang dominan bagi menghasilkan warna yang serasi.(warna nampak blend cantik)


4. Cuba susun foto di atas cardstock sehingga dapat hasil yang memuaskan hati.


5. Ukur foto untuk dipotong. Bagi mendapatkan gambar yang seimbang, ukur dari hujung objek dalam anggaran 2 inci kiri dan kanan.


6. Bagi memudahkan kerja2 memotong, trimmer amat diperlukan. (memang senang sangat)


7. Tampal belakang gambar menggunakan mountain squares.


8. Mat gambar dan gunting menggunakan decorative scissors. Buat tanda menggunakan pencil di belakang kertas dan gunting.


9. Mat kertas untuk journaling.


10. Eyelet setter


11. Eyelet yang telah siap.


12. Riben digunakan untuk menggantung journaling.


13. Gam semua gambar.


14. Gunakan journal genie untuk melukis garis di atas kertas journaling, ini untuk memastikan tulisan tidak senget.


15. Siap


ps - terima kasih kepada salliwalli sebab teman Ida sepanjang kelas berlangsung.


02 March 2007

My creations no.7


Bookworm.


Fresh from scrapbook oven...
mmmm...sorry for the poor picture (shaking)...... Hope i'll improve my skills after class tomorrow.


Source
Cardstock : Sei
Pattern Paper : Autumn Leaves MOD Collection Wink Floral
Ribbon: American Crafts Elements Premium Ribbon Downtown
Maroon

Sticker : Making Memories Sticker Value Pack
Rose Petal / Mango
Pen : White Gelly Roll by Sakura

What scrapbooking item are you?

Im a fibers. : )

You are Fibers!Fun and crazy at times. You are a warm fuzzy kind of person. You run around getting things done but still find time for fun! You have so many diverse interests that it is often hard to pin you down to any one thing. People love your friendly attitude and carefree ways. You often brighten other people's days. But Fibers Beware - Sometimes people don't take you seriously because of your happy-go-lucky ways. Sometimes you find yourself feeling left out from decision making that could directly affect you. Even though you like to be happy and cheerful, make sure others know that you can also be serious and in tune with reality.


Scrapbookers, try this quiz http://www.quizilla.com/users/Prismcat/quizzes/
and let me know what type of scrapbooking item are you.. enjoy