
Sorry kengkawan lambat nak post barang yang dapat hari tu sebab sibuk sangat. Ni pun nak post satu2 sebab nak bagi penerangan tentang kegunaan sekali. Buat homework sikit tadi tentang cara penggunaan....enjoy reading ya...
From about.com
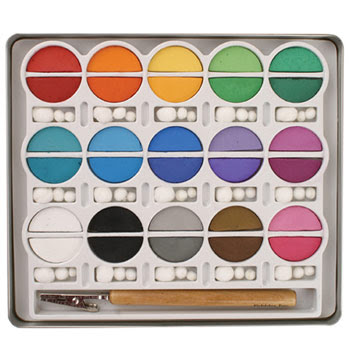
Soft & easy to blend BEAUTIFUL colors presented in a secure metal case.Applicator & reusable pom poms included.Case 7 x 8 Acid free Over 28 Colors.
Price: us$16.00
Applying Chalks: Apply the colors using your finger, a cosmetic sponge, crunched up paper towel,pom pom or a soft brush. Reapply chalk until the desired intensity of color is achieved. Stray marks can be erased with an art eraser.
Blending/Shading Colors: For shaded areas begin with the lightest color, moving to the darker, blending the edges of one color directly over another to achieve a third color. There are endless possibilities for colors and blends.
T E C H N I Q U E S
BACKGROUND TECHNIQUES
Chalk and water can be combined for a pastel background effect. Apply chalk in one or more colors randomly to the paper. Using a wet rag or sponge, pull and blend the chalked areas as desired. This technique is an excellent way to add color to freezer paper that will be used for gift wrap or gift bags. Once the background is dry, it can be stamped over, and it does not require spray fixative to remain in place.
Marbled background: Put about an inch of water into a pan slightly bigger than your card, With a knife, scrape chalk dust of several colors onto the surface of the water. Lower the paper flat onto the surface of the water to pick up the color, immediately lifting the card back out of the water. Allow to dry flat. If your paper develops puckers, it can be ironed to flatten it back out.
CHALK ON DARK PAPER: Create stunning stained glass designs. Stamp and emboss a stained glass design using white or metallic embossing powder. Color the inside areas with a heavy application of chalk, achieving a suede-like texture.
CHALK WITH THE BLENDER PEN: Chalk colors can be beautifully blended with the blender pen, which also "sets" the chalk, eliminating the need for spray fixative.
FINISHING YOUR PROJECT: If desired, use a spray fixative or hairspray when finished to keep chalk from smearing. This will also deepen the colors and add sheen.
USING THE BLENDER PEN WITH INK PADS
USING THE BLENDER PEN WITH MARKERS
Stamp an image by coloring the rubber die of the stamp with water based markers. Pull color from the outline to the center areas by stroking with the blender pen, as above.
Use a blender pen to apply marker ink which has been scribbled onto a plastic plate, blending the colors just like you would blend watercolor paints with a brush.
Use a blender pen to soften the stroke marks left behind when you have colored an area with markers.
USING THE BLENDER PEN WITH WATERCOLOR PENCILS
From about.com
Soft & easy to blend BEAUTIFUL colors presented in a secure metal case.Applicator & reusable pom poms included.Case 7 x 8 Acid free Over 28 Colors.
Price: us$16.00
Chalk are wonderful for blending colors and achieving softpastel effects. They can be used forshading in areas, creating backgrounds, coloring in a stamped design, etc.
H O W T O U S E
Applying Chalks: Apply the colors using your finger, a cosmetic sponge, crunched up paper towel,pom pom or a soft brush. Reapply chalk until the desired intensity of color is achieved. Stray marks can be erased with an art eraser.
Blending/Shading Colors: For shaded areas begin with the lightest color, moving to the darker, blending the edges of one color directly over another to achieve a third color. There are endless possibilities for colors and blends.
T E C H N I Q U E S
BACKGROUND TECHNIQUES
Chalk art makes a wonderful background for stamped projects.
For a streaked background, such as a sunset or sunrise, start near the center of the card and streak the colors outward. Combine several colors. Pull your finger or a sponge from the center out to the edge. Apply one color at a time, spacing the streaks as desired and then blend colors. Stamp the scenery elements on afterwards. (You may find matte finish paper to be the best choice for blending chalk colors.) An alternative for this technique is to cut a mask, covering the center area of the card. The streaks will appear to radiate from a center white area.
For a streaked background, such as a sunset or sunrise, start near the center of the card and streak the colors outward. Combine several colors. Pull your finger or a sponge from the center out to the edge. Apply one color at a time, spacing the streaks as desired and then blend colors. Stamp the scenery elements on afterwards. (You may find matte finish paper to be the best choice for blending chalk colors.) An alternative for this technique is to cut a mask, covering the center area of the card. The streaks will appear to radiate from a center white area.
Chalk and water can be combined for a pastel background effect. Apply chalk in one or more colors randomly to the paper. Using a wet rag or sponge, pull and blend the chalked areas as desired. This technique is an excellent way to add color to freezer paper that will be used for gift wrap or gift bags. Once the background is dry, it can be stamped over, and it does not require spray fixative to remain in place.
Marbled background: Put about an inch of water into a pan slightly bigger than your card, With a knife, scrape chalk dust of several colors onto the surface of the water. Lower the paper flat onto the surface of the water to pick up the color, immediately lifting the card back out of the water. Allow to dry flat. If your paper develops puckers, it can be ironed to flatten it back out.
CHALK ON DARK PAPER: Create stunning stained glass designs. Stamp and emboss a stained glass design using white or metallic embossing powder. Color the inside areas with a heavy application of chalk, achieving a suede-like texture.
CHALK WITH THE BLENDER PEN: Chalk colors can be beautifully blended with the blender pen, which also "sets" the chalk, eliminating the need for spray fixative.
FINISHING YOUR PROJECT: If desired, use a spray fixative or hairspray when finished to keep chalk from smearing. This will also deepen the colors and add sheen.
Using a Blender Pen
The blender pen is a dual tip marker which is filled with clear blending fluid. The tip of the pen can be cleaned by simply scribbling ink color (from the last use) onto a scrap paper until it flows clear. Even though the tip appears stained, future performance will not be affected.
The blender pen is a dual tip marker which is filled with clear blending fluid. The tip of the pen can be cleaned by simply scribbling ink color (from the last use) onto a scrap paper until it flows clear. Even though the tip appears stained, future performance will not be affected.
T E C H N I Q U E S
USING THE BLENDER PEN WITH INK PADS
Stamp an image using a water based dye pad. Use the blender pen to lightly stroke the outline color into the inside areas. This will result in an image with several tones of the same color; for example, a deep blue image with lighter, "watered down" blue inside.
USING THE BLENDER PEN WITH MARKERS
Stamp an image by coloring the rubber die of the stamp with water based markers. Pull color from the outline to the center areas by stroking with the blender pen, as above.
Use a blender pen to apply marker ink which has been scribbled onto a plastic plate, blending the colors just like you would blend watercolor paints with a brush.
Use a blender pen to soften the stroke marks left behind when you have colored an area with markers.
USING THE BLENDER PEN WITH WATERCOLOR PENCILS
The blender pen is perfect for blending watercolor pencil colors, eliminating the need for water and a paintbrush. The colors intensify and blend smoothly, and the paper does not buckle from being over-moistened.
USING THE BLENDER PEN WITH CHALK
USING THE BLENDER PEN WITH CHALK
Blend and moisten chalk colors with the blender pen to intensify colors and work the chalk into the surface of the paper. It will not need spray fixative to remain in place.
No comments:
Post a Comment